Key Steps for Successful Thermostat Installation
Efficient thermostat installation is crucial for maintaining a comfortable and energy-efficient home environment. Properly setting up your thermostat ensures precise temperature control, leading to enhanced comfort and reduced utility bills. This guide will walk you through the essential steps for a successful thermostat installation, from selecting the right model to wiring and programming it for optimal performance. By following these key steps, you can seamlessly integrate your thermostat into your home’s heating and cooling system, ensuring reliable and efficient operation.
Choosing the Right Thermostat for Your Home
Selecting the right thermostat is the first critical step in ensuring successful thermostat installation. Begin by considering the compatibility of the thermostat with your home’s HVAC system. There are various types of thermostats, including programmable, smart, and non-programmable models. Each offers different features and benefits. Programmable thermostats allow you to set schedules, while smart thermostats provide advanced features like remote control via smartphone apps and learning your habits for optimized energy usage.
Additionally, think about your home’s specific needs and your lifestyle. For instance, if you have a variable schedule, a smart thermostat might be the best choice due to its adaptability. Research different brands and models, read customer reviews, and possibly consult with an HVAC professional to ensure you make an informed decision. A well-chosen thermostat can significantly enhance your home’s comfort and energy efficiency.
Gathering the Necessary Tools and Materials
Before starting the thermostat installation, gather all the necessary tools and materials to avoid interruptions. Basic tools required include a screwdriver set, a drill (if needed), wire strippers, and a level. Ensure you also have the thermostat’s instruction manual, mounting hardware, and any additional accessories that came with the thermostat. Having everything prepared and at hand will streamline the installation process and prevent unnecessary trips to the hardware store.
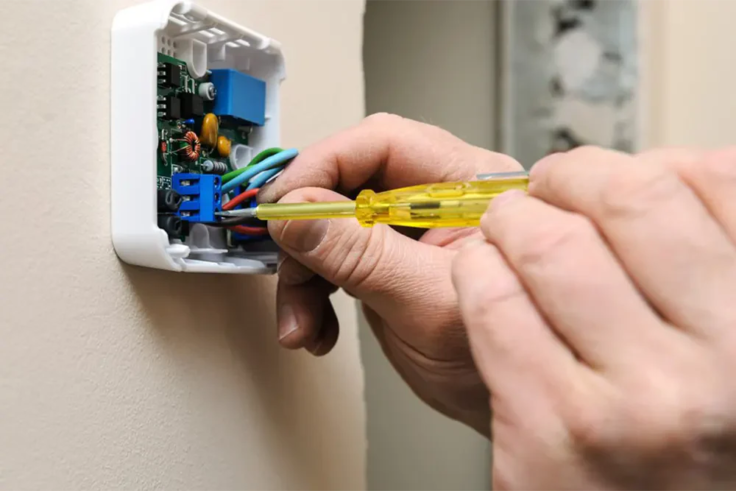
In addition to tools, it’s helpful to have a voltage tester to ensure that power is completely off to the HVAC system before starting work. Some installations might require additional items like wall anchors or wire labels, depending on your specific setup. Proper preparation is key to a smooth and efficient installation process, minimizing the risk of mistakes and ensuring your new thermostat functions correctly.
Understanding Your Current Thermostat Setup
Understanding your current thermostat setup is essential for a successful upgrade. Begin by inspecting the existing thermostat and noting how it is wired. Take a picture or label the wires with tape to ensure you know where each one connects. This step is crucial, especially if you are upgrading to a more complex model that might have additional features and wiring requirements.
Next, review your HVAC system’s compatibility with the new thermostat. Different systems, such as single-stage, multi-stage, or heat pump systems, may require specific wiring configurations. Consulting the wiring diagram in your thermostat’s manual can help clarify any uncertainties. By thoroughly understanding your current setup, you can avoid common pitfalls and ensure a smooth transition to your new thermostat.
Turning Off Power to the HVAC System
Safety is paramount when working with electrical components, making it essential to turn off power to the HVAC system before beginning thermostat installation. Locate the circuit breaker that controls your HVAC system and switch it off. This step prevents any risk of electrical shock and ensures a safe working environment. Use a voltage tester to double-check that the power is off, as an extra precaution.
Once you have confirmed that the power is off, you can safely proceed with removing the old thermostat and installing the new one. Working with live wires is dangerous and can damage your new thermostat or even your HVAC system. Ensuring the power is off not only protects you but also ensures that your installation process goes smoothly and without incident.
Removing the Old Thermostat Safely
Before removing the old thermostat, ensure the power to the HVAC system is turned off at the circuit breaker. This step is crucial to avoid electrical shock and protect your HVAC system from damage. Begin by removing the thermostat cover, which usually snaps off or is secured with a small screw. Once the cover is removed, you will see the thermostat’s wiring connected to the wall plate.
Carefully disconnect the wires, labeling each one with tape to remember their original positions. This will make connecting the new thermostat much easier and help avoid mistakes. Unscrew the wall plate and gently remove it from the wall, being cautious not to damage the wires. By taking these precautions, you can safely and efficiently remove the old thermostat, setting the stage for the new installation.
Preparing the Wall for the New Thermostat Installation
After removing the old thermostat, inspect the wall for any damage or debris. Clean the area thoroughly to ensure a smooth surface for the new thermostat. If there are any holes or imperfections, use spackle or a similar filler to repair them, and allow it to dry completely. This step is essential for a clean and professional-looking installation, as well as ensuring the new thermostat mounts securely.
Once the wall is prepared, measure and mark the mounting holes for the new thermostat base. Use a level to ensure that the marks are straight, which will help in mounting the thermostat accurately. Drilling pilot holes can make it easier to insert screws and anchors, especially if you’re working with drywall. Preparing the wall properly ensures that the new thermostat installation will be stable and visually appealing.
Mounting the Thermostat Base
With the wall prepared, it’s time to mount the thermostat base. Align the base with the marked holes and use a level to double-check its alignment. Secure the base to the wall using the screws provided, ensuring it is firmly attached. If necessary, use wall anchors to provide additional support, especially in drywall installations. A secure base is crucial for the stability and functionality of your new thermostat.
After mounting the base, guide the wires through the designated opening, making sure they are easily accessible for connection. Double-check that the base is level and securely fastened. This step is critical for ensuring that the thermostat functions correctly and stays in place over time. With the base mounted securely, you are ready to proceed with wiring the new thermostat, setting the stage for a successful installation.
Connecting the Thermostat Wiring
With the thermostat base securely mounted, the next step is connecting the wiring. Refer to the photo or labels you made when removing the old thermostat to match each wire to the corresponding terminal on the new thermostat base. Most thermostats come with a clear wiring diagram in the instruction manual, which can guide you through this process. Ensure that each wire is firmly connected to the correct terminal to prevent any malfunctions.
Carefully insert each wire into its designated terminal and tighten the screws to secure them in place. It’s important to ensure that there are no loose connections, as this could affect the performance of the thermostat. Once all wires are connected, double-check their placements to ensure accuracy. Proper wiring is crucial for the thermostat to communicate effectively with your HVAC system, ensuring optimal performance and efficiency.
Securing the Thermostat Unit
After the wiring is correctly connected, it’s time to secure the thermostat unit to the base. Align the thermostat with the mounted base, ensuring that all connectors are properly lined up. Gently snap the thermostat into place or secure it with the provided screws, depending on the model. Make sure it is firmly attached and sits flush against the wall for a neat and professional appearance.
Once the thermostat unit is secured, restore power to the HVAC system at the circuit breaker. Turn on the thermostat and follow the setup instructions provided in the manual. This may involve setting the date and time, programming temperature schedules, or connecting to a Wi-Fi network if it’s a smart thermostat. By carefully securing the unit and following setup procedures, you ensure your new thermostat is ready for efficient operation, enhancing your home’s comfort and energy management.
Maintaining Your Thermostat for Long-Term Efficiency
Proper maintenance of your thermostat is essential for ensuring its long-term efficiency and reliability. Start by regularly cleaning the thermostat unit to remove dust and debris, which can affect its performance. Use a soft, dry cloth to gently wipe the surface and avoid using harsh chemicals that could damage the device. Additionally, check the batteries periodically if your thermostat operates on battery power, and replace them as needed to prevent any interruptions in its functionality.
Another important aspect of maintenance is periodically reviewing and updating your thermostat settings to match your current schedule and seasonal changes. For programmable and smart thermostats, make sure the programming aligns with your daily routine to maximize energy savings. If you have a smart thermostat, take advantage of software updates provided by the manufacturer, as these can improve functionality and introduce new features. Regular maintenance and adjustments ensure that your thermostat operates efficiently, providing optimal comfort and energy management for your home.
Following these key steps for successful thermostat installation will ensure your home stays comfortable and energy-efficient. Whether you are upgrading to a smart thermostat or replacing an old unit, careful planning and proper execution are crucial. If you need professional assistance, Cool Factory, Inc. in Sterling, VA, is here to help. Our expert technicians are ready to handle all your thermostat installation needs.
Contact us today at (703) 713-5113 to schedule an appointment and experience top-notch service and support. Trust Cool Factory, Inc. for all your HVAC needs and enjoy a perfectly controlled home environment.


